Pet Portrait Painting, Step by Step: Abbey #5

Welcome  to the fifth installment of my Pet Portrait Painting, Step by Step: Abbey Blog post!  Today we will continue painting Abbey, moving down the length of her snout developing and finishing  her nose and mouth. Here is how it will unfold:  I will, in sequence, show one or more pictures at a time with a brief explanation of  what was happening at that time during the work. To enlarge these pictures just click on them to get the full view, then click them again and they will enlarge! Lets Do It!!!

Step By Step: Abbey #24

Step By Step: Abbey #24

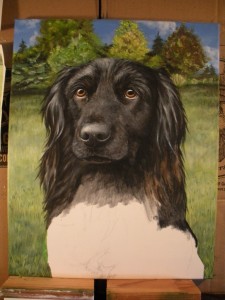
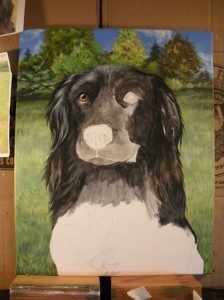
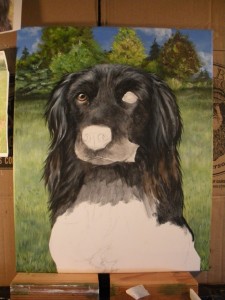
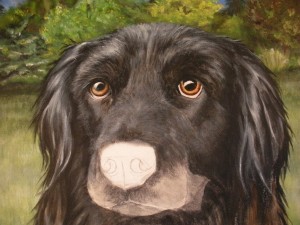
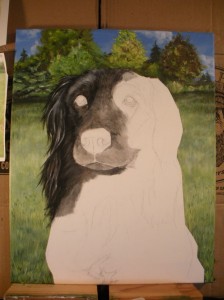
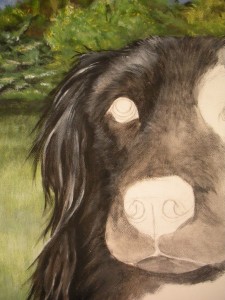
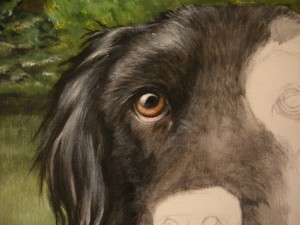
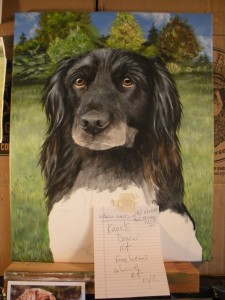
At the end of our last Step by Step: Abbey Blog post I had just finished with her left eye and was starting to work down the snout and into the nose area. We pick it up here with picture #24. I have laid in more detail on the nose.  If the eyes are the most important facial feature in a Pet Portrait, the nose is a close second.  As the observer, the nose, in most pictures and paintings, will be the closest thing to you,(Except if you are working with a Bulldog or Pug). For this reason it has to look accurate and natural. Dogs noses are moist, the light will reflect, this needs to be shown as well.  The nose is not finished yet in this photo but it is getting close. There are still no highlights and I need to make sure the nostril shapes are sized correctly and are even.

Also in picture #24 you will see a piece of paper with some notes on it. Throughout the execution of a Portrait such as this, I will periodically write down things I need to change, work on,or remember. This note is reminding me to rework the ears and the forehead a little. I will usually take care of these changes during my next painting session.

Step By Step: Abbey #25

Step By Step: Abbey #25

Step By Step: Abbey #26

Step By Step: Abbey #26

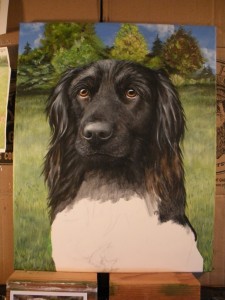
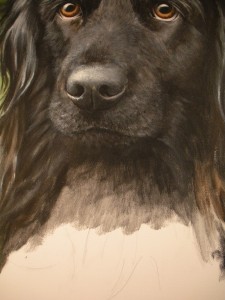
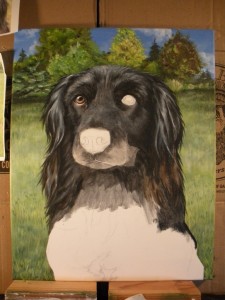
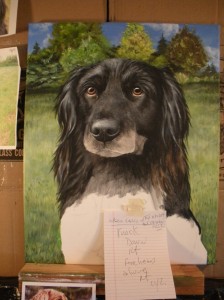
In picture #25 I have pretty much finished the nose on Abbey. I will still, like with the eyes, go back and make small adjustments, mainly with highlights, but for now I am ready to continue lower into the mouth area of the snout.  Picture #26 is a closeup of #25, and you can see my notes are gone, so I had made those other little adjustments before I continued into the next area.
Step By Step: Abbey #27

Step By Step: Abbey #27

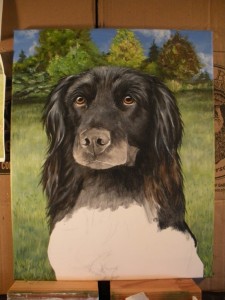
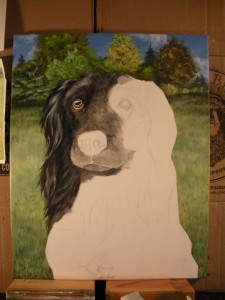
 In Picture #27 I have been detailing the mouth region, and have continued as always with my initial base coats of the neck/chest area.  Again, always working ahead of myself a little to keep the whole picture flowing evenly and seamless.

Step By Step: Abbey #28

Step By Step: Abbey #28

Step By Step: Abbey #29

Step By Step: Abbey #29

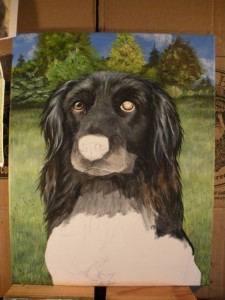
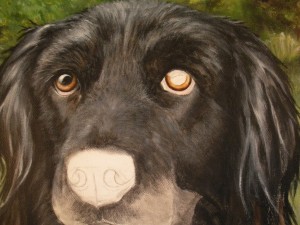
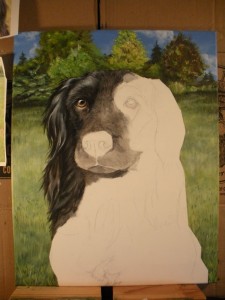
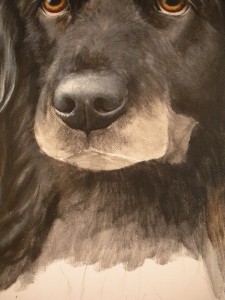
Pictures #28 and #29 show the finished snout area,(minus the whiskers). #29 is a close up of #28.  There may not seem to be much of a difference between these two pics and Picture #27,  but if you look closely I have darkened and detailed the areas directly on the sides of Abbeys snout, under her nose, and have adjusted some values above her nose area as well.  Whiskers you ask? Or at least I will ask for you, They come later, and I will explain at that point why they need to be one of my final moves on a Pet Portrait. 

All of the work you saw and read about today took me approximately 5 hours to complete.  Thank you for reading my Blog here on Pet Portraits By Cy. Check back next week for Blog post #6, the last installment in this “Pet Portrait Painting, Step by Step: Abbey” series. If you know some art lovers or other painters out there who may find this interesting or educational, feel free to share this. Also I will be happy to answer any questions you may have throughout this series of  Blog posts,  You can Email me from my website,  or click the “leave a comment” link here in this Blog post, or you can comment on my Pet Portraits By Cy Facebook fan page: http://www.facebook.com/petportraitsbycy  Have a great day everyone! Cy
Pet Portrait Painting, Step by Step: Abbey #4

Welcome  to the fourth installment of my Pet Portrait Painting, Step by Step: Abbey Blog post!  Today we will continue painting Abbey, moving right, across the painting to her left ear and left eye.  Here is how it will unfold:  I will, in sequence, show one or more pictures at a time with a brief explanation of  what was happening at that time during the work. To enlarge these pictures just click on them to get the full view, then click them again and they will enlarge! Lets Do It!!!

Step by Step: Abbey #17

Step by Step: Abbey #17

At the end of the third installment on this Abbey, Step by Step  blog post series, I had just finished painting her right eye. Now as you can see in Picture #17  I have moved across the canvas to the right and am developing the left side of her ear and eye area. Other areas, the snout and lower, are recieving primary medium tones. As I mentioned in the last post, I always work ahead of myself a little so I am constantly blending one finished area into  the next partially finished one to keep the transition seamless.

Step by Step: Abbey #18

Step by Step: Abbey #18

Step by Step: Abbey #19

Step by Step: Abbey #19

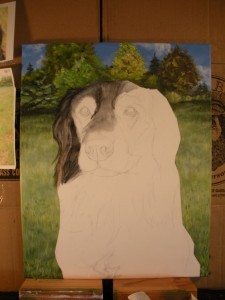
 Pictures #18 and #19 show the further development of this area. Picture #18 is the first pass, if you will, and the subsequent finish, which, as you can tell is more detailed, is featured in #19. At this point I have detailed all of the areas around her left eye, and can start laying in color on this most important section. Also you can tell I have worked my way down the bridge of Abbey’s nose and the left side of her face in preparation for the painting of the snout.

Step by Step: Abbey #20

Step by Step: Abbey #20

Step by Step: Abbey #21

Step by Step: Abbey #21

Step by Step: Abbey #22

Step by Step: Abbey #22

Pictures #20, 21 and 22 show the first progressions on Abbey’s left eye. Picture #21 is a close up of picture #20. Just as with the right eye, I have first just laid in the color, carefully matching it to my reference photos, and my notes..AND, now I need to match it to her right eye color as well.

Step by Step: Abbey #23

Step by Step: Abbey #23

In Picture #23 I have finished Abbeys left eye. As I have stated before, throughout the rest of this painting I will continually be scrutinizing both eyes and may make small modifications to further dial them in to perfection. I cannot emphasize enough how important it is in any Pet Portrait, that the eyes be ACCURATE.  Directly after I finished the left eye, you can also see in picture #23 that I have continued work on the snout and have laid in the first strokes in the actual nose area.

All of the work you saw and read about today took me approximately 6 hours to complete.  Thank you for reading my Blog here on Pet Portraits By Cy. Check back next week for Blog post #5 in this “Pet Portrait Painting, Step by Step: Abbey” series. If you know some art lovers or other painters out there who may find this interesting or educational, feel free to share this. Also I will be happy to answer any questions you may have throughout this series of  Blog posts,  You can Email me from my website,  or click the “leave a comment” link here in this Blog post, or you can comment on my Pet Portraits By Cy Facebook fan page: http://www.facebook.com/petportraitsbycy  Have a great day everyone! Cy
Pet Portraits In Charcoal “Bear”

"Bear" Pet Portraits In Charcoal

"Bear" Pet Portraits In Charcoal


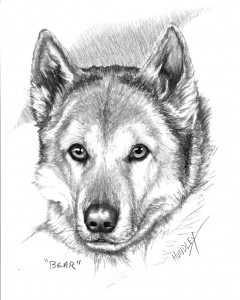
Click on this picture, then click on the next version of it to enlarge! 

Welcome back to my Pet Portraits In Charcoal Blog!  Please read on about  Bear,  his breed, and other Pet issues…WHEN YOU FINISH…If you would like your pet, or a friends pet portrayed in an 11 x 14 in. Charcoal Portrait sent to you, (or anyone you choose), anywhere in the world, and included in one of these blog posts for the world to see… Please visit this link and get the Info!   http://www.petportraitsbycy.com/?page_id=743

Bear is a very unique looking and beautiful dog, He is half German Shepherd and half Malamute.  Bear is owned by Elisa and Mike from Broomfield Colorado. If these names sound familiar its because they were also the owners of “Shadow” from a previous Blog post. Bear was adopted by Elisa and Mike because they wanted a friend for Shadow. Bear is 14 years old and although he has had 3 surgeries, 2 on his knees and one to correct a stomach problem , he is doing  just fine. When Shadow was alive,  Bear spent many years  as his companion,  and they were indeed best of friends.

Shadow was the Alpha between the two, and Bear apparently always wanted to play and rough house with him especially as a puppy. Bear got his name because when he was first spotted by Elisa he looked like a stuffed bear toy, soft and fluffy. Bear is friendly to strangers, and will on occasion bring a toy to you to play with him, but he also can be a bit dramatic and emotional and is very protective of his family. he knows if one of his masters is not feeling well and he is very intuitive.  Mike tells me he is a little set in his ways and can be a little high maintenance, but at his age we all figure he has earned that right.

The German shepherd is the result of selective breeding, originally the stock came from various herd and work breeds. This breed is used extensively in police work.  He is very strong and sturdy and is unconditionally loyal. Once this dog extends his loyalty he will not transfer it easily and his owner must be willing to maintain this close bond. Bear has all of these traits.  The Alaskan Malamute is a sled dog, named after  the tribe that bred him. Legend has it that his ancestors were wolves, he is heavily muscled and is a very hard worker, he does love to pull a sled and is still used primarily for this job. The malamute  has a mild disposition and is a great family dog, and is good with children.  Bear also exhibits the best qualities from this breed as well.

Bear comes down from, I believe,  two of the most beautiful dog breeds. He shares, along with certain characteristics of both, the good looks of both as well. Certainly a pleasure for me to capture him in Charcoal. Thank you Bear, Elisa and Mike for the opportunity.

  Thank you for reading My Pet Portraits In Charcoal Blog. Please share this Blog with anyone who may be interested. Coming up next will be the 4th installment of my Pet Portrait Painting, Step by Step:” Abbey” series!  A good day to all, and of course to all of your pets as well! Cy

Pet Portrait Painting, Step by Step: Abbey #3

Welcome back to the third installment of my Pet Portrait Painting, Step by Step: Abbey Blog post!  Today we will start to paint Abbey!  Here is how it will unfold:  I will, in sequence, show one or two pictures at a time with a brief explanation of  what was happening at that time during the work. To enlarge these pictures just click on them to get the full view, then click them again and they will enlarge! Lets Do It!!!

Step by Step: Abbey #11

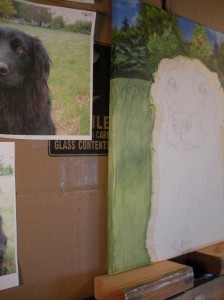
When I paint a Portrait, as we saw in Blog post #2 of this series, I always start with, and finish, the background before putting any paint on the animal. I really want the subject of the painting (the animal) to stand out in front of what is going on in the background.  In picture #11 above I have finally started to paint Abbey. When working in Acrylic, and Pastel, I always start to paint the animal in the same way; from the animals, in this case Abbey’s  right ear moving down and from the upper left of the canvas to the lower right.  I do this for two reasons. Number one, most of the time I paint right handed (yes there are times I also need to paint lefty as well) So I want to be painting in an area that is not covered in any way by my brush, hand , or arm. Moving from upper left to lower right continuously gives me a clear view of my work as I execute it. Secondly, it keeps everything I have finished clean. There is no chance of any drips or water or smudging on a finished area because I will not be painting across it.  I will of course do small touch ups and correction throughout the work, anywhere on the canvas where they are needed. but the bulk of the paint gets appropriated in this top to bottom, left to right fashion. Here in #11 I am just beginning to lay in a medium tonal ground which I will soon build upon.

Step by Step: Abbey #12

Step by Step: Abbey #12

Step by Step: Abbey #13

Step by Step: Abbey #13

In picture #12 I have detailed Abbeys right ear, and have started working around the right eye. I always paint the surrounding areas of the eyes before I paint the eyes themselves. I really need to get the shapes and nuances of the occipital areas correct so that when I do paint the eyes I do not need to keep adjusting them if something is off. The eyes are the most important part of the portrait any little thing that is askew is easily seen by everyone!! Picture #13 is a closeup of  #12. Also  you can see I have started to work ahead of myself a little and have begun the medium tones for the snout and Abbeys left eye area. I will always do this, blending one area into the next.

Step by Step: Abbey #14

Step by Step: Abbey #14

In picture #14 I have pretty much finished around Abbey’s right eye and have blocked in the pupil and iris color. No shading or blended highlighting yet, at this point I am mixing colors trying to match that eye color with my reference material and my notes.

Step by Step: Abbey #15

Step by Step: Abbey #15

Step by Step: Abbey #16

Step by Step: Abbey #16

In picture #15 I have shaded and highlighted Abbey’s right eye. Picture #16 is a close up view. I will always go back, throughout the painting of a portrait, and make little adjustments to the eyes. They have to be perfect, but at this point I am ready to continue across Abbeys forehead to her upper left quadrant.

All of the work you saw and read about today took me approximately 6 hours to complete.  Thank you for reading my Blog here on Pet Portraits By Cy. Check back next week for Blog post #4 in this “Pet Portrait Painting, Step by Step: Abbey” series. If you know some art lovers or other painters out there who may find this interesting or educational, feel free to share this. Also I will be happy to answer any questions you may have throughout this series of  Blog posts,  You can click the “leave a comment” link here in this Blog post or you can comment on my Pet Portraits By Cy Facebook fan page: http://www.facebook.com/petportraitsbycy  Have a great day everyone! Cy
New Pet Portrait By Cy, “Izzie and Belle”

To enlarge this picture just click on it to get the full view, then click it again and it will enlarge! 
Izzie and Belle

Izzie and Belle

 
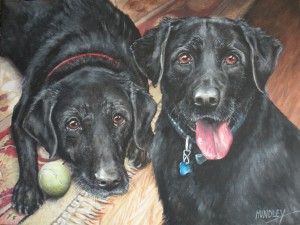
 Welcome  back to the Pet Portraits By Cy Blog.  I want to share with you my most recent Acrylic Pet Portrait,  “Izzie and Belle”. Izzie and Belle are both Black Labrador Retrievers.  Both Izzie and Belle were brought home on the same day by their owners Lucinda and Bill from Denver Colorado. They were the same age but came from different litters. They were adopted sisters. I am sorry to write, that Izzie passed away shortly after I started this Portrait. She was 14 years old. I was lucky enough to meet her,  and she was a very sweet dog, and had a wonderful life with her sister Belle and her owners, which provided a wonderful home for both of them.  Belle as well as  Lucinda and Bill, has suffered a great loss. I could tell she was sad but she is greatly loved and the three of them, I am sure, will help each other through this.

According to Lucinda, Izzie was the boss between the two dogs while they were growing up. She Loved her Tennis Ball, which she is pictured protecting here. Izzie would fetch her ball for hours with Belle present always, waiting  for her opportunity to snatch the ball away when Izzie got tired and reap the benefits of returning it to her master.  Izzie’s love for balls did not only include the tennis variety, She at times would wander onto the nearby Golf course and would chase the Golf  balls as well!

Izzie and Belle were always together, Their breed as we will see later, love to hunt and track. I was told, that as younger dogs, they would work together to corner and trap rabbits and other small animals on the property. They were always a team.  Even when I was there visiting, and at the age of 14 Belle was rooting through the snow as if looking for something to retrieve and bring back to the doorstep.

The Labrador retriever was once known as a St John’s Newfoundland. They were brought to this country from Labrador by seamen aboard cargo vessels. Labrador is located in  North Eastern North America. Between the Atlantic and the Hudson Bay. Fishermen in this area used these dogs for retrieving  fish that escaped from their nets.  The Labradors lineage is a little obscure although he probably contains many of the same elements that make up the other retrievers. The Labrador enjoys a justly deserved reputation as an excellent, and responsible worker who can retrieve waterfowl and upland birds, both on land and in icy waters many times a day. He is an easy going household companion. loves being part of a family, and has also been used very successfully in police work and as a guide dog for the blind. Labrador Retrievers can be yellow, brown or black, and can weigh between 55 and 70 pounds.

It was a great experience meeting and Painting Izzie and Belle. I consider myself  lucky to have had this opportunity, and I hope that my work properly honors these two beautiful dogs. I also hope that, in a small way, this portrait will help Izzie to live on forever.  Thank you for reading this New Pet Portrait Blog post. Feel free to share this with anyone who may be interested, and check back soon for the Third installment of my Pet Portrait Painting, Step by Step Blog Post series!   Have a great time with your animals! Cy
Pet Portrait Painting, Step by Step: Abbey #2

Welcome back to the second installment of my Pet Portrait Painting, Step by Step: Abbey Blog post!  Now that we are going to get into the actual execution of the art, here is how it will unfold:  I will, in sequence, show one or two pictures at a time with a brief explanation of  what was happening at that time during the work. To enlarge these pictures just click on them to get the full view, then click them again and they will enlarge! Lets Do It!!!

Step by Step: Abbey #2

Step by Step: Abbey #2


Step by Step: Abbey #3

Step by Step: Abbey #3

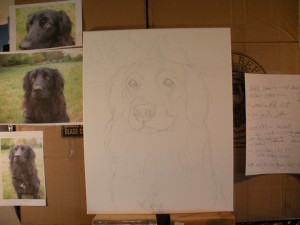
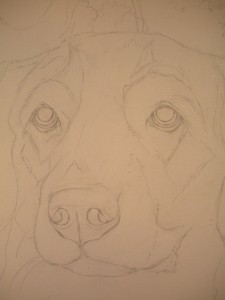
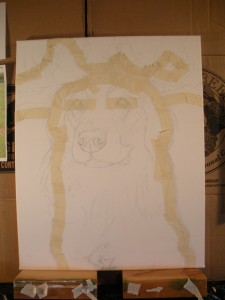
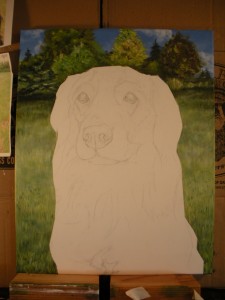
 I am starting with picture #2, because Abbey #1 was, of course, the blank 16 x 20 in. canvas. The first thing I need to do is draw the lines which I will follow while painting. Here in #2, and the close up in #3, the lines have all been drawn, and at this point I am happy that my drawing is accurate, I will not stop this process until I am. The drawing is the #1 component of an Accurate portrait.

Step by Step: Abbey #4

Step by Step: Abbey #4

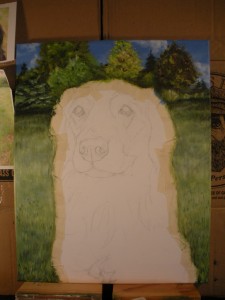
After my drawing is complete I need to tape off my animal, as seen here in picture #4…WTH does that mean Cy? Well I paint a portrait from the background (the distance) to the foreground (the front). I want Abbey to be sharp and really appear in front of what is going on behind her. With Abbey taped off I can paint, and finish the entire background with out compromising her lines. Then, when I do paint Abbey, I am literally painting her on top of and in front of the background. This makes for a more clean and convincing composition. LETS PAINT!

Step by Step: Abbey #5

Step by Step: Abbey #5


Step by Step: Abbey #6

Step by Step: Abbey #6

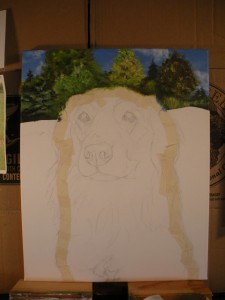
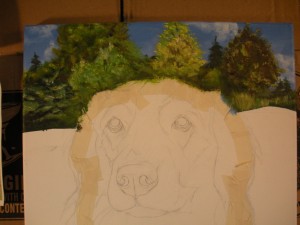
In pictures #5 and #6 I started with the Sky, farthest back. Then removed the tree line tape, and I  painted the trees. These are the most distant compositional areas.  I have also in this picture removed the tape line separating the grass from the tree line.

Step by Step: Abbey #7

Step by Step: Abbey #7


Step by Step: Abbey #8

Step by Step: Abbey #8

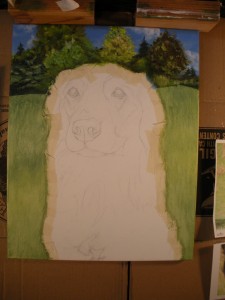
In picture #7 I am starting to move even closer to Abbey by painting the grass where she is sitting, again working from back to front. In picture #8 I am showing you that throughout the painting of this portrait I need to also paint the sides. I paint what is called a “Gallery Wrap” on all of my portraits, continuing the picture around the sides of the canvas. This gives the painting a finished look if the owner wants to hang it, as is, without a frame.

Step by Step: Abbey #9

Step by Step: Abbey #9


Step by Step: Abbey #10

Step by Step: Abbey #10

Picture #9 shows the finished background, and Abbey is still taped off. Picture #10 is to me like another blank canvas. I have finished everything but my main subject. I have removed the last of the tape, and I am ready to begin painting Abbey, the real star of the show!!  In the “Pet Portrait Painting, Step by Step: Abbey” post #3,  She will begin to come to life!

All of the work you saw and read about today took me approximately 15 hours to complete.  Thank you for reading my Blog here on Pet Portraits By Cy. Check back next week for Blog post #3 in this “Pet Portrait Painting, Step by Step: Abbey” series. If you know some art lovers or other painters out there who may find this interesting or educational, feel free to share this. Also I will be happy to answer any questions you may have throughout this series of  Blog posts,  You can click the “leave a comment” link here in this Blog post or you can comment on my Pet Portraits By Cy Facebook fan page: http://www.facebook.com/petportraitsbycy

Pet Portraits In Charcoal “Shadow”

"Shadow" Pet Portraits In Charcoal

"Shadow" Pet Portraits In Charcoal


Click on this picture, then click on the next version of it to enlarge! 

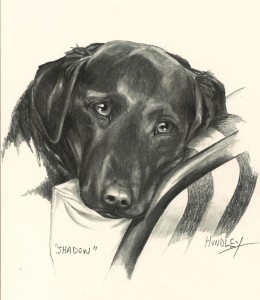
Welcome back to my Pet Portraits In Charcoal Blog!  Please read on about  Shadow,  his breed, and other Pet issues…WHEN YOU FINISH…If you would like your pet, or a friends pet portrayed in an 11 x 14 in. Charcoal Portrait sent to you, (or anyone you choose), anywhere in the world, and included in one of these blog posts for the world to see… Please visit this link and get the Info!   http://www.petportraitsbycy.com/?page_id=743

Shadow was owned by Elisa and Mike from Broomfield Colorado. Shadow was a present from Mike to Elisa after Elisa graduated from Nursing school. Shadow is half  Black Labrador and half Chow Chow. Shadow exhibited traits from both of  these breeds and I will touch on this shortly.

Elisa chose Shadow because when they went to adopt, they noticed Shadow (not named as of yet) crying and distraught in his little area. Apparently his brother was just adopted and Elisa and Mike just could not resist bringing him home. Mike said” Say hello to Mom” and his wonderful life with his new owners began. Shadow got his name because he constantly followed Elisa everywhere she went, like her shadow. During walks Mike would have to sometimes pick up Shadow when he was young and carry him home, sometimes stopping by the neighborhood little league baseball games to watch and rest. Elisa states that Shadow was a five person dog, staying close to people in the immediate family plus a close family friend, Jeanette. For some reason Shadow and Jeanette just hit it off.  Shadow passed away at the age of 13.  He is dearly missed but had a wonderful life with Mike and Elisa. They took very good care of him throughout his life and he reciprocated by being a faithful and protective companion. I am grateful to be able to portray Shadow in this Portrait, He is a beautiful Dog.

A Black Labrador is happiest when he can have both a family and a field. He has a very favorable disposition and is very good with children. They are bright and alert with an extraordinary sense of smell. This breed enjoys being trained as a gun dog. Shadows  “five Person dog”  characteristic comes from his Chow Chow side. They are a very intense breed and his loyalty makes him a one man dog . They are highly intelligent and can show aloof disdain for anyone other than his master. The Chow Chow is the only dog in the world with a blue black tongue. Shadow had the best characteristics of both of these wonderful breeds.

Thank you for reading My Pet Portraits In Charcoal Blog. Please share this Blog with anyone who may be interested. Next up will be my second addition of the Pet Portrait Painting, Step by Step series.  Have a wonderful time with your animals!  Cy
Pet Portrait Painting, Step by Step: Abbey #1

Step by Step: Abbey #1

Step by Step: Abbey #1

Step by Step: Abbey #Finish

Step by Step: Abbey #Finish


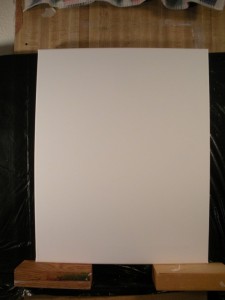
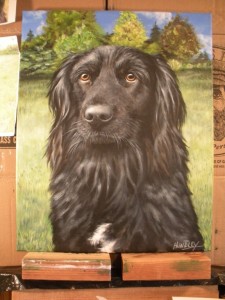
Welcome to the first Installment of my Pet Portrait painting, Step by Step Blog!  How did I get from the blank canvas on top to the finished Portrait under it?  Well, that is what I am going to show you throughout this Blog series.  Many if not most, or all of you who may want to commission me may wonder how your beautiful Portrait gets so, well, Beautiful!  How did Cy do it? The answers lie in this Blog series. I will be showing you step by step how I paint a Portrait. Thanks to Dan AND Abbey for giving their blessing on this project, you can read Abbeys official Blog post here if you just scroll down.
 
Every one of the Blogs in this series will feature a number of pictures taken during the execution of this Pet Portrait Painting of Abbey. I will also explain what was going on at each stage depicted. 
For today other than introducing this Blog project to you, and giving you  the start, and finished product pictures, I want to explain briefly what needs to happen even BEFORE I can start a painting.
First after being commissioned I need reference material, Pictures of the animal. for a local client, I will visit the pet and its owners, and will take many photos. I will then print out a contact sheet and will revisit the owners and we will decide together on the exact picture we want to paint from. These visits are also important so I can learn about the animal, and can get a feel for their demeanor, personality etc… I also will take a close look at their coat, and eye color and any other physical characteristics that my camera may not pick up on.  Also the final composition of the piece needs to be discussed, what will be in the background?, any props or toys?, color schemes etc… For an out of state client I will be dependant upon the pet owners to provide me with as much of this info as they can. Including a number of good photos.
I want everyone to read  about all of this pre-painting work because it is just as important as  the actual execution of the piece, but before the piece can be started, all of this research and effort must take place to ensure an accurate and important Portrait. 
Thank you for reading the first intallment of my Pet Portrait Painting, Step by Step Blog. On Abbey #2 we will start working on the canvas! Please share this with any of your  art or animal loving  friends, thanks, Cy 

Pet Portraits In Charcoal, “TC”

"TC" Pet Portraits In Charcoal

"TC" Pet Portraits In Charcoal

Click on this picture, then click on the next version of it to enlarge! 

Welcome back to my Pet Portraits In Charcoal Blog!  Please read on about  TC, his breed, and other Pet issues…WHEN YOU FINISH…If you would like your pet, or a friends pet portrayed in an 11 x 14 in. Charcoal Portrait sent to you, (or anyone you choose), anywhere in the world, and included in one of these blog posts for the world to see… Please visit this link and get the Info!   http://www.petportraitsbycy.com/?page_id=743

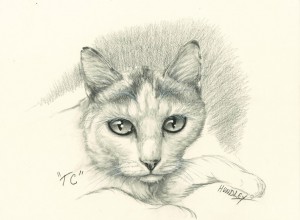
TC  was owned by Betty from Westminster Colorado. TC”s breed, in Betty’s words is a “plain old short haired white cat”. More about this breed, and its more specific name in a  moment. “TC” stands for Trash Compactor.  This name came about because Betty’s daughter found this little thing at a recycling center next to a Trash Compactor machine.

TC past away a couple of years ago and is dearly missed. He lived to be 17 years old. For his first 10 years he lived with Betty’s daughter, and her husband, and then moved in with Betty shortly there after. Betty had two other cats and apparently they all got along wonderfully together. Betty says that TC was a quiet, good, social kitty.

Before moving to Betty’s house TC was living with a couple of dogs and he would get a little skittish at times. In an attempt to find a good hiding place, at one point, he almost got sheet rocked into a wall during a basement renovation. Betty’s son and son in law had to be extra careful with TC around on the construction site!

TC, as stated earlier, is considered a “Short haired plain old white cat”  Now I was not able to find this particular breed in my breeders manual so I am going to figure he was either a British or American short hair. The American short hair originally came from the British breed and was introduced to the new world from Europe by working aboard the ships coming to America as mousers protecting the ships stores of supplies. They quickly developed the special characteristics needed to cope here in these different  regions and climates.

TC was a beautiful cat, and from what I learned, had a wonderful life, (other then being born near the trash compactor thing of course!). He was very well cared for and loved, and for sure was blessed to end up with this family.  I am honored to have had the opportunity to draw him.

Thank you for reading this Pet Portraits In Charcoal Blog. Please share this with our other cat lovers! My next Blog will be the first in my new Pet Portrait Painting, Step By Step series. Also, of course be looking for more of these Charcoal Portrait Blogs soon!  Some beautiful dogs are up next!  Cy

Pet Portraits In Charcoal, “LuLu”

"LuLu" Pet Portraits In Charcoal

"LuLu" Pet Portraits In Charcoal

 Click on this picture, then click on the next version of it to enlarge!

Welcome back to my Pet Portraits In Charcoal Blog!  Please read on about  LuLu, her breed, and other Pet issues…BUT FIRST…If you would like your pet, or a friends pet portrayed in an 11 x 14 in. Charcoal Portrait sent to you, (or anyone you choose), anywhere in the world, and included in one of these blog posts for the world to see… Please visit this link and get the Info!   http://www.petportraitsbycy.com/?page_id=743

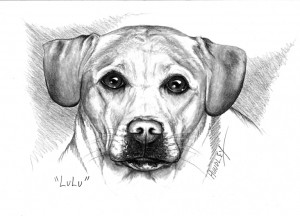
LuLu is a hybrid breed, A cross between a French Bulldog, and a Labrador retriever. I will be discussing her breed shortly but first…..LuLu is Jon’s dog. He is 12 and is the brother of Julia, (who owns Clare, the object of my last Blog). LuLu is one of the 5 animals in the household, and she is basically the boss. She herds the other animals, is very vocal, will talk to you, and loves to sleep and snuggle with everyone in the family, including the other animals.

LuLu is an excellent watch dog, but has a very sweet disposition. She loves to chew her bone and she eats her dinner lying down, which earned her the nickname “Lazy Lu”  from the family. Jon and LuLu love each other very much, Jon says he was looking for a special dog for three years before they adopted LuLu, and In his words, ” It was an Instant connection”. LuLu keeps tabs on both Jon and Julia and herds them whenever she can. LuLu is a great addition to this house hold and this is another wonderful example of the story of a boy and his dog. 

LuLu is called a FrenchieLabrador, half French Bulldog, half Labrador Retriever. She has the best characteristics of both breeds. The French Bulldog was bred in 19thcentury England as a companion dog, called a “Toy Bulldog”, it is small, muscular and has a smooth coat. Its best known characteristic is its over sized “Bat” ears. It is very affectionate and is considered an excellent Lap warmer.  It got its name because it became very popular in France and it was here that the breed gained notoriety.

The Labrador retriever is the most popular breed in the U.S.. It originated in Newfoundland as a companion to fisherman, and eventually, a retriever for game. Its prime objective in life is to please its Masters so it excells as a guide dog, and with its even temperament and train ability, it  is a wonderful Family dog.

I have spent a fair amount of time with LuLu and she for sure has all of these great characteristic qualities from both of these breeds. I would highly recommend a Frenchie Labrador for the family who wants a medium sized, low maintenance and loyal dog.

Thank you for reading this installment Of Pet Portraits In Charcoal! In the coming weeks I have many more fun and interesting animals to share with you. I will be posting at least one Blog per week and many weeks more. Also be on the lookout for my “Pet Portrait Painting, Step by Step Blog” featuring the daily work progression that took place during my painting of  “Abbey”. Please share this if it may interest your friends, and I will be blogging with you again soon! Cy